That enabled me to download a 12MB iso to kickstart the CentOS installation and to install other packages as needed from the web, instead of downloading more than 4GB of installation files.
Note: You can pick other mirror sites as desired.
Change ownership of /local/notesdata recursively to "notes" and chmod this folder recursively to allow Read & Write for notes & notes group
$ su
# /sbin/chkconfig --levels 0123456 sendmail off
copy the Domino linux installation tar into /install
# tar xvf
# cd /install/linux/domino
Start the Domino installation:
# ./install

From here, follow through the installation prompts using defaults or over-riding as needed. In the following,
I accepted the default option "Manual". We can start the server in listening mode for a one-off configuration later.
The rest of the installation is straight-forward. At the end of the installation, you will see a prompt as follows:

Have fun!
I specified HTTP when prompted where the installation files are, and filled in the following:
web URL: centos.arcticnetwork.ca
image file: pub/centos/5/os/i386/
web URL: centos.arcticnetwork.ca
image file: pub/centos/5/os/i386/
Note: You can pick other mirror sites as desired.
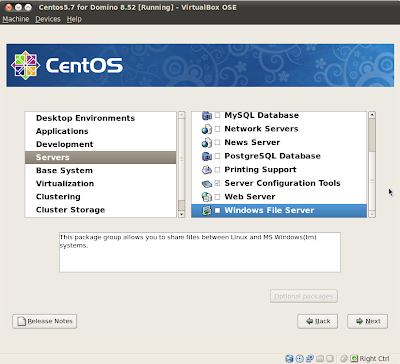
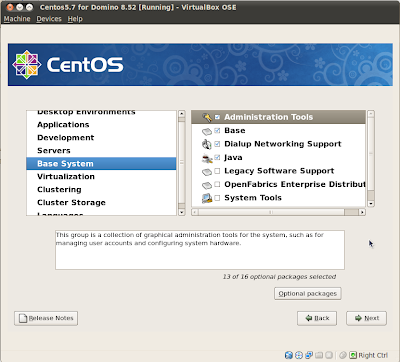
When setting up CentOS, I selected the following to ensure that only required items are installed.

Under Servers, be sure to de-select all server components (except for Server Configuration Tools, if desired)
And under Base System, ensure Java is selected.
Once CentOS is installed, create a new user "notes". Login as notes. Apply all system updates as prompted.
From a terminal:
# su
Apply all required patches for Domino on Linux as follows, based on this technote from IBM Ref: https://www-304.ibm.com/support/docview.wss?uid=swg27013075 :
$ yum install glibc libgcc libXp libstdc++ alsa atk cairo compat-libstdc++ expat fontconfig freetype2 glib glib2 glibc glitz gtk gtk2 libgcc libpng pango resmgr unixODBC zlib xorg-x11-libs compat-libstdc++-33 compat-libstdc++-296
Create the necessary folders as follows:
/local/notesdata
/install [note: this is the folder where we will store the Domino for linux tar file]
Change ownership of /local/notesdata recursively to "notes" and chmod this folder recursively to allow Read & Write for notes & notes group
$ su
# chown -R notes:notes /local/notesdata
# chmod -R 664 /local/notesdata
Turn off unnecessary services:
# /sbin/chkconfig --levels 0123456 sendmail off
# /sbin/chkconfig --levels 0123456 cups off
copy the Domino linux installation tar into /install
# tar xvf
# cd /install/linux/domino
Start the Domino installation:
# ./install
From here, follow through the installation prompts using defaults or over-riding as needed. In the following,

I accepted the default option "Manual". We can start the server in listening mode for a one-off configuration later.
The rest of the installation is straight-forward. At the end of the installation, you will see a prompt as follows:

Have fun!
3 comments:
chrissy metz weight loss secret
best curling iron for short hair
what causes fruit flies
floor planner software mac
Bt Notification App For Smartwatch
https://songstamilmp3.com/song/yeh-hai-mohabbatein-episodes-mp4-download.html
Android Mod Apk Hack
Post a Comment